
This is a simple and elegant way to add glamour to your nails. You can do these designs at home, and they will only take a few minutes. All you need are some basic supplies and a little bit of creativity.
There are many different ways to do rhinestone nails, but we’ll show you some of the most popular designs. First, you’ll need a base coat of polish. Once that’s dry, it’s time to start adding the stones. You can either use glue or nail adhesive to apply them. If you’re using glue, be sure to apply a thin layer, so the stones don’t fall off.
Once the stones are in place, you can add a top coat of polish to seal everything in. And that’s it! These simple rhinestone designs will take your nails from ordinary to glam in no time.
Or check out: 50 Instagram Baddie Acrylic Nails That Are Perfect For You!
Contents of Article
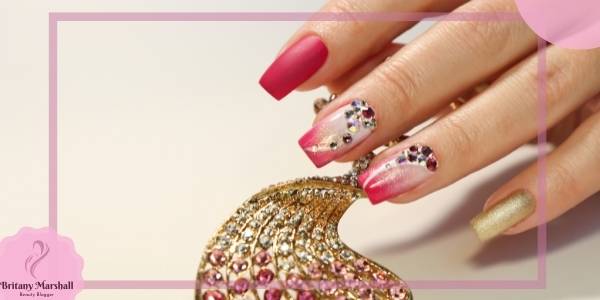
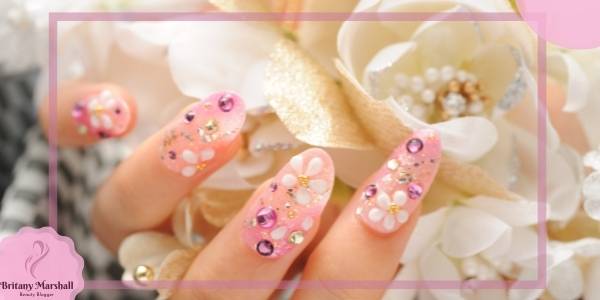
11 easy and elegant rhinestone nail designs

We’ve got you covered if you’re looking for some simple and elegant rhinestone nail designs. These designs are easy to do at home, and they only take a few minutes. Here are eleven of our favorite designs:
1. The basic design
This is the perfect design for beginners. Add some rhinestones to your nails in a random pattern, or create a design of your own.

2. The French manicure

A classic French manicure with a twist. Add some rhinestones to the tips of your nails for a glamourous look.
View this post on Instagram
3. The waterfall
This design is sure to impress. Create a cascade of rhinestones down the center of your nails.
View this post on Instagram
4. The accent nail
Stand out from the crowd with an accent nail covered in rhinestones.

5. The half-moon
Give your nails a whimsical look with a half-moon of rhinestones.

6. The chevron
This trendy design is perfect for any occasion. Create a chevron pattern out of rhinestones on one or more nails.

7. The zigzag
Another trendy design that’s perfect for adding some glamour to your nails. Create a zigzag pattern with rhinestones.

8. The diagonal
This design is perfect for those who want something a little different. Add rhinestones to your nails in a diagonal pattern.
9. The swirl
Create a beautiful swirl design with rhinestones on one or more nails.

10. The Ombré
This popular design is easy to create with rhinestones. Add them to your nails in an Ombré pattern.
11. The gradient
Another popular design that’s easy to recreate with rhinestones. Add them to your nails in a gradient pattern.

Rhinestone nail designs for short nails
Rhinestone nail designs can add a touch of glamour to any outfit, and they are perfect for special occasions. But you don’t have to wait for a special occasion to wear them! You can wear rhinestone nail designs any time you want. They are perfect for summertime when you want your nails to look their best. Rhinestone nail designs are also ideal for the winter when you want to add a little sparkle to your look.
If you like short nails, check out these 30 ideas designed for the perfect summer style!
1. Classic Cute Short Nails with Rhinestones on them
There are many different ways to wear rhinestone nail designs. You can choose from a variety of colors and styles. You can also mix and match different colors and styles to create your unique look. Rhinestone nail designs are easy to apply, and they last for days. So if you’re looking for a way to add some glamour to your nails, try rhinestone nail designs!
2. cute rhinestone nail designs

3. Short with a bling
View this post on Instagram

4. Simple and stylish

5. Still elegant

6. Simply beautiful
7. Short and sweet
How to choose the right rhinestone nail design for you
When choosing a rhinestone nail design, it’s essential to consider your outfit and personality. If you’re going to a formal event, you might want to choose a more elegant design. If you’re going to a casual event, you might want to choose a more playful design. You also need to consider the color of your outfit. For example, if you’re wearing a black dress, you might want to choose a nail design with black rhinestones.
It would help if you also considered your personality. Do you like bold and flashy designs, or do you prefer subtle designs? Do you like shiny rhinestones, or do you prefer matte rhinestones? Consider your style and your taste when choosing a rhinestone nail design.

Once you’ve considered your outfit and your personality, it’s easy to find the right rhinestone nail design for you. There are many different designs to choose from, so take your time and find the perfect one for you. With so many different designs to choose from, you’re sure to find the perfect rhinestone nail design for your next special occasion!
How to do simple rhinestone nail designs
If you’re looking to add some glamour to your nails, rhinestone nail designs are the way to go. These simple designs are easy to do at home, and they only take a few minutes.

Here’s how to do them:
- First, apply a base coat of polish.
- Once that’s dry, it’s time to start adding the stones.
- You can either use glue or nail adhesive to apply them.
- If you’re using glue, be sure to apply a thin layer, so the stones don’t fall off.
- Once the stones are in place, you can add a top coat of polish to seal everything in.
- And that’s it!
These simple rhinestone designs will take your nails from ordinary to glam in no time.
DIY Video Tutorial
How to add rhinestones to your nails from scratch
Adding rhinestones to your nails is a simple process that can add a lot of glamour and personality to your look.
View this post on Instagram
Here are the steps to do it:
1. Start by painting your nails with a base coat. This will help the rhinestones stay in place and protect your nails from the adhesive.
2. Choose the rhinestones you want to use and place them on a flat surface.
3. Apply a small amount of adhesive to the back of each rhinestone.
4. Place the rhinestones on your nails, making sure they are in the position you want them to.
5. Let the adhesive dry completely before applying a top coat.
Last Thoughts
Look at these dazzling nail art designs if you’re looking to add some glamour to your nails. These designs are perfect for special occasions like weddings and galas, and they’ll add some serious sparkle to your look. So take a peek at these beautiful designs and get inspired to create your dazzling nails!
Popular Read: How Often Should You Take A Break From Acrylic Nails?